Mature organizations often have an abundance of sources producing contextual data. LogRhythm SmartResponse is a great tool to help automate this influx of data, as well as take enforcement action on findings. When launched from the search interface, however, SmartResponse Plugins may require deeper knowledge of these tools—knowledge exceeding typical analyst training. Credentials need to be managed, defaults and limits tuned, and, in some cases, actions removed.
When securely implemented, this process involves pivoting around password databases, providing documentation, utilizing external tools, and eventually returning to the LogRhythm SIEM Platform to execute.
This task may seem daunting, but here is a way to optimize your automation process all from the inspector pane of your deployment by customizing your SmartResponse actions!
Customizing SmartResponses are easier than many initially believe. You do not have to focus on building something from the ground up, but instead, tune what already works. In this particular use case, a customized SmartResponse enables you to automate tasks while masking credentials and removing sensitive actions. This automation allows your advanced analysts and investigators to quickly use and access tools and services previously out of reach due to licensing and training constraints. To begin customizing SmartResponse, you’ll need to gather the appropriate tools.
Gathering Tools
The following example uses default windows tools for accessibility, but it is highly recommended to employ a capable text editor with good syntax highlighting. Sublime and Notepad++ work very well, but VS Code has proven to be a strong choice when working with PowerShell. VS Code adds code completion and even provides the ability to test your code when developing on Linux and Mac. Fortunately, the Windows-bundled PowerShell ISE is more than adequate for customizing both the scripts and the XML that defines a SmartResponse. You’ll also need a capable archive manager on Windows. This example uses 7zip, but tar via Cygwin or Windows Subsystem for Linux both work effectively.
Please note: The following example involves storing credentials and API keys in a SmartResponse. Any individual with access to the SIEM could extract the SRP and decompress the LPI to gain access to the API key.
Customizing Your SmartResponse
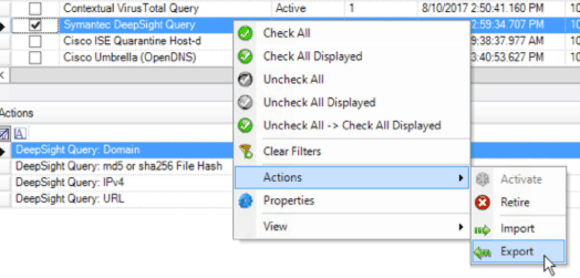
It’s time to dig in. Start from the SmartResponse Manager in the Administration section of the tools dropdown menu in your Deployment Manager. Since you are tuning an existing SmartResponse plug-in that is already providing alarm value, you should start by exporting a plug-in out of your environment.
 Figure 1: Exporting a Plug-In Out of Your Environment (Click Image to Enlarge)
LogRhythm automatically names the saved, exported file based on GUID, so it’s highly advantageous to rename it immediately.
 Figure 2: Renaming the Exported File (Click Image to Enlarge)
An .lpi file is just a renamed .tgz or .tar.gz file. If you are working outside of Windows you can extract the file in one shot. Take note, you won’t have execute permissions on the directories, and can’t explore them in Linux or Mac without a quick “chmod +x” command. On the Windows side, 7zip can make quick work of this file extraction, even without renaming the initial extension.
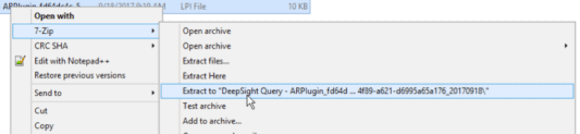 Figure 3: 7zip Extracts a File from a Windows Environment (Click Image to Enlarge)
Of course, you’re working in a nested archive, so expect to extract the file twice.
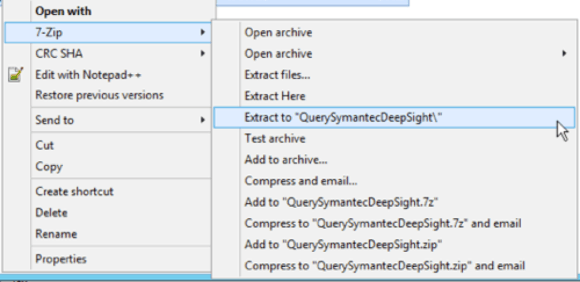 Figure 4: Extracting the File Twice (Click Image to Enlarge)
Now, a little housekeeping. If the bin and config folders exist in the file, move the contents of the bin up a level, and then delete both the bin and config folders. They aren’t necessary to re-generate the plug-in and removing them will make tracking changes cleaner and easier.
Next, open the PowerShell ISE and drag the actions.xml file into the editor. You’ll be greeted with a properly formatted and colorized XML file.
To keep things organized in the SmartResponse Plugin Manager, rename the plugin and generate a new Guid. The latter can be done by running the command “[System.Guid]::NewGuid()” within PowerShell, and is essential if you plan to keep the basic SmartResponse around.

Figure 5: Renaming the Plugin and Generating a New Guid (Click Image to Enlarge)
Each action has a list of command line parameters. Details on how these parameters should be interpreted can be found in the SmartResponse Plugin Development Guide on the LogRhythm Community. Below you can see the API string that the platform is going to encrypt once the string has entered. This means the input will be masked in the user interface (UI), and stored in a safe manner.
 Figure 6: API String that the Platform Will Encrypt (Click Image to Enlarge)
Next, modify each action you’d like to streamline. In this case, remove the EncryptedParameter key, change the StringParameter to a constant, and embed the API Key directly into the action definition. All keys in this example have been changed to protect the innocent (and my licensing). If you are running a version of LogRhythm prior to 7.3, you will want to prefix each Action Name with a unique identifier so that it’s easy to find and fast to filter for in the Web UI. On LogRhythm 7.3 or higher you can simply rename the plug-in.
 Figure 7: Actions are Modified and Prefixed with the Unique Identifier “SOC” (Click Image to Enlarge)
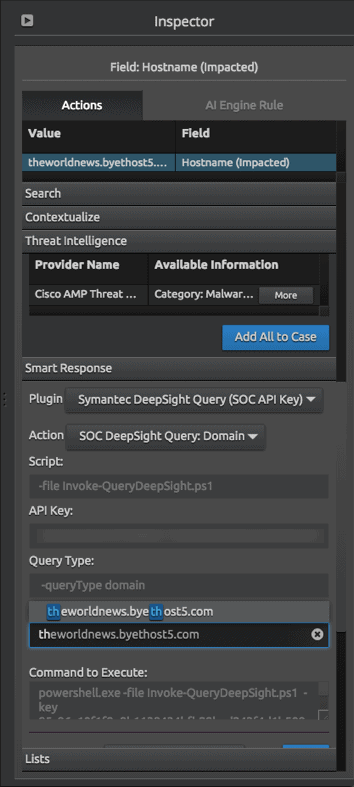 Figure 8: Renaming the Plug-in (Click Image to Enlarge)
Save the .xml file. You’ll then need to create the new plugin back in the SmartResponse Manager. Click on Create Plugin, then click Browse… and find the folder with the files you’ve been working on. After clicking OK, click Validate. This checks the validity of the actions.xml and then unmasks the Create button.
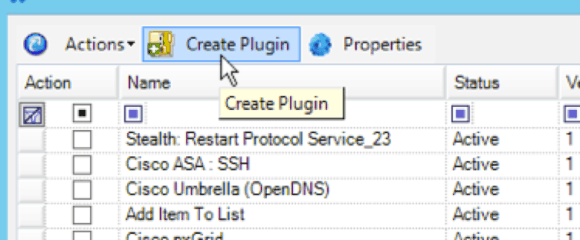 Figure 9: Creating the New Plug-In in SmartResponse Manager (Click Image to Enlarge)
This will create a new plugin (.lpi) file. Again, rename the file from the GUID name to keep track of it. You can then import the plug-in file like any other. And there you have it: a pre-populated API Key, ready to fire with fewer keystrokes or copy and pastes than ever.
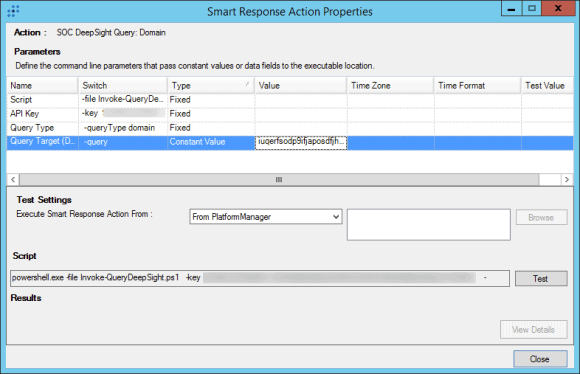 Figure 10: A Pre-Populated API Key (Click Image to Enlarge)
But Wait, There’s More
What if you don’t want the API Key to be circulated? What if you want to limit some of the available actions so someone doesn’t, for example, accidentally disable your CEO’s laptop? Your SmartResponse may have 18 possible actions, but you can add a default API Key to help limit action availability.
Start with the exported plug-in folder, which should be ready for editing. Did you notice the pluses for each Action definition? The pluses, or code collapse, make it an easy matter to remove actions you may not want your analysts to take. Just click on the plus to collapse the undesired action, highlight the action line, and hit the delete key.
 Figure 11: Deleting an Undesired Action (Click Image to Enlarge)
Next, remove the API Key portion of the action definition. Pay close attention to the “Order=” digit for each parameter. In the below example, the key’s order is “2.” Once you have removed or cut the 2, the other parameters will need their orders changed to fill in the resulting gap.
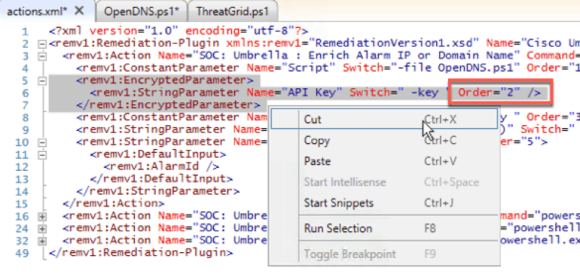 Figure 12: Cutting out Key with the Order “2” (Click Image to Enlarge)
Now it’s time to edit some PowerShell! This process will be easier than all of the above XML you’ve dealt with thus far. PowerShell makes defining a default for a parameter very easy, but mandatory parameters may need to be made optional.
We’re going to change:
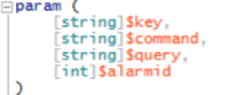 Figure 13: Original Script (Click Image to Enlarge)
To:
 Figure 14: Modified Script (Click Image to Enlarge)
 Figure 15: Mandatory Parameters Made Optional (Click Image to Enlarge)
To wrap it all up, create a new plug-in as seen above in Figure 10. Import the plug-in back into the SIEM, and then head over to your Dashboard so you can test in Production.
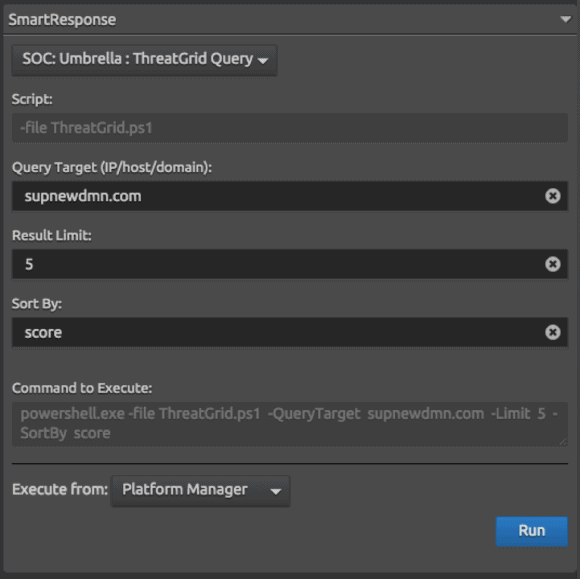 Figure 16: Testing the Plug-in in Your Dashboard (Click Image to Enlarge)
After testing, you should end up with a similar outcome as the below SmartResponse Result.
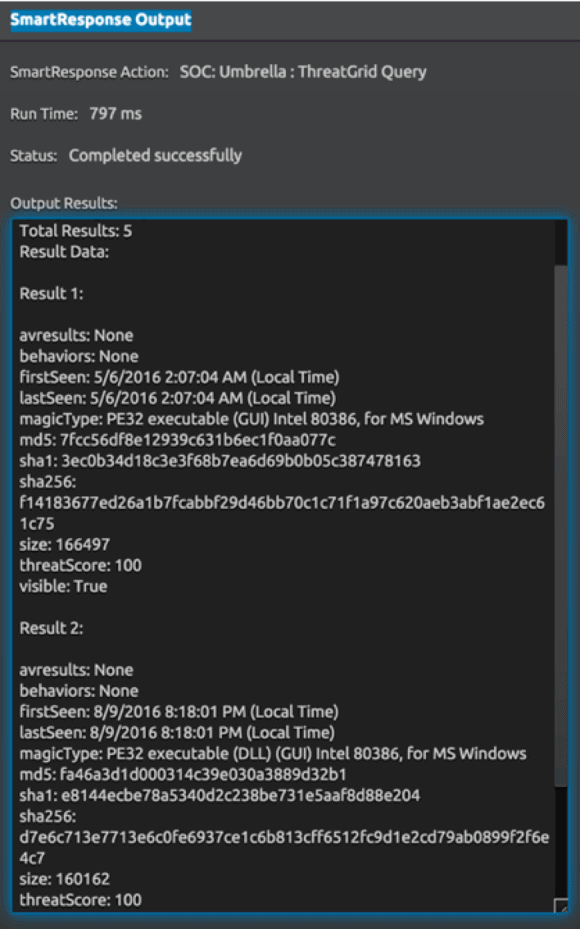 Figure 17: SmartResponse Results (Click Image to Enlarge)
Streamlining Your Security Operations
Editing existing SmartResponses will result in a more efficient security operations center (SOC) and fewer user credentials floating around your network. Start with SmartResponses that your security team uses many times a day. By embedding the API Key and focusing on available actions, your team won’t have to switch across password vaults, external tools, and research sites. This will save your team precious time and mental energy, and enable them to focus on more pressing tasks at hand.