Collaboration between Greg Foss, Kjell Hedstrom, Dan Schatz-Miller, Michael Swisher, and Craig Cogdill
LogRhythm NetMon is a powerful forensics tool that allows organizations to capture, analyze, and alert on network data. Traditionally, NetMon is deployed on a blade server within an organization’s data center.
However, there are many situations where a smaller, more tactical device is the optimal solution. NetMon Freemium provides customers with a free and easy way to deploy NetMon on a small and compact system. This is ideal for the home network, branch offices, forensic go-kits, penetration testing drop boxes, and much more.
You might be wondering: how easy it is to deploy NetMon? To demonstrate, we decided to build a miniature device ourselves.
NetMon Hardware Requirements
With the release of NetMon version 3 and the Freemium license, the hardware requirements have been scaled back significantly, to allow for installation on a diverse array of systems.
NetMon requirements are as follows:
- Intel x86 chipset
- CPU/Processor: 2 cores (4 cores recommended)
- Network interface controllers (NICs): 1 1Gbps NIC (2 1Gbps NICs recommended)
- 60GB of storage (120GB+ recommended)
- 4GB RAM (8GB recommended)
For this project, we used the QOTOM-Q190G4 — a small, portable, fan-less, micro-PC. This is a Quad Core system that comes with a 2GHz CPU, 8GB RAM, four Ethernet ports, two USB ports, a VGA port, and two Wi-Fi NIC’s. The computer itself is passively cooled as the whole chassis is a heat-sink. This results in a silent solution that manages low temperatures under full load. This is ideal for a home network or small satellite office.
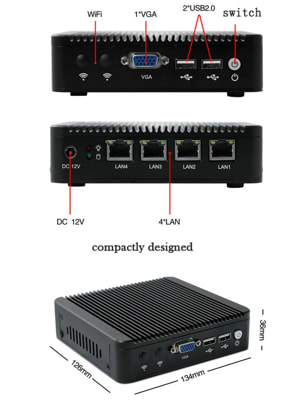
Figure 1: Micro-PC hardware specifications
The next piece of hardware you need is the passive network tap. We used the Throwing Star LAN Tap available from the Hak5 Shop. These small and simple network taps allow for monitoring of small 10BASE-T and up to 100BASE-TX networks. There are many other and more powerful ways to do this, but we chose this route because we are primarily targeting the home network. In the future, we’d like to embed this functionality directly into the device.
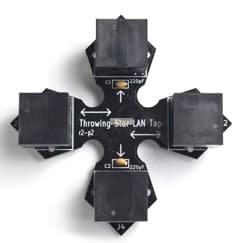
Figure 2: Throwing Star LAN Tap
Note that if you use a passive tap, be aware that your maximum bandwidth will not be 1 Gb/s. Most passive taps can only split up to 500Mbps without significant loss of signal.
Alternatives
We tested the hardware mentioned above and it works well, we also analyzed other hardware options. Nearly anything with comparable specs will work, including Intel NUC devices, old laptops, or other hardware you might have at home.
Software
Now that we identified the hardware, we need to get the NetMon image flashed onto the device. This sounds a bit easier than it is, so follow the steps below to ensure a successful installation.
- First, download NetMon Freemium here.
- Burn the ISO file to a disk and use an external CD ROM drive to install the software or copy the ISO.USB contents to the drive and use a USB to install NetMon.
- To prepare the installation USB, begin by wiping the drive (OS X instructions below):
- $ diskutil list
- $ diskutil info
- $ diskutil eraseDisk FAT32 NETMON MBRFormat /dev/
- Once the drive has been wiped successfully, copy the contents of the ISO over to the USB and make the drive bootable. There are many ways to do this, so we’ll use (dd) on OS X for this example.
- This can be done in the same way on Linux. However, if you’re creating the install media on a Windows machine, we recommend using Unetbootin.
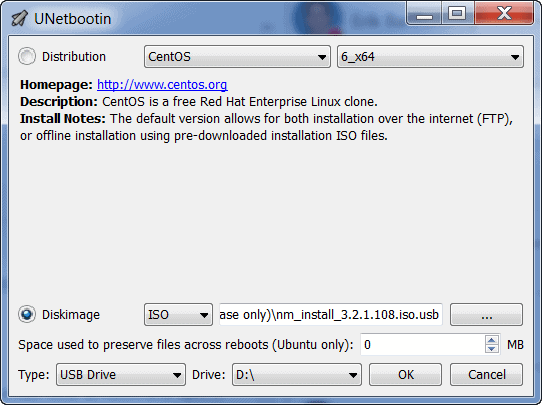
Figure 3: Unetbootin ISO to USB configuration
- Now that the drive is ready, boot the hardware to the USB drive and follow the instructions to install NetMon.
Initial Configuration and Testing
Once NetMon is successfully installed onto the Micro-PC, the next phase is deployment. This can vary greatly depending on the deployment scenario, so we’ll focus on testing and validation first.
Ensure that the NetMon appliance is plugged into power and then connect the ethernet cables as shown below. ‘LAN1’ is the management interface and ‘LAN4’ is the going to be used to sniff network traffic. Refer to the picture below, which shows a basic configuration designed to sniff traffic from a single computer.
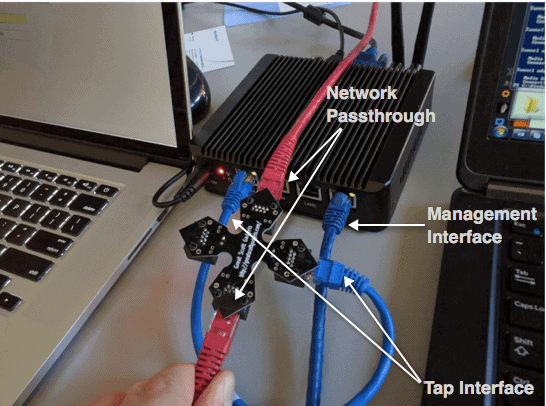
Figure 4: LAN tap configuration
Once again, we’re using a minimum of two ports. One is our “input” from the tap. The other is our “output” to the NetMon user interface (Management Interface).
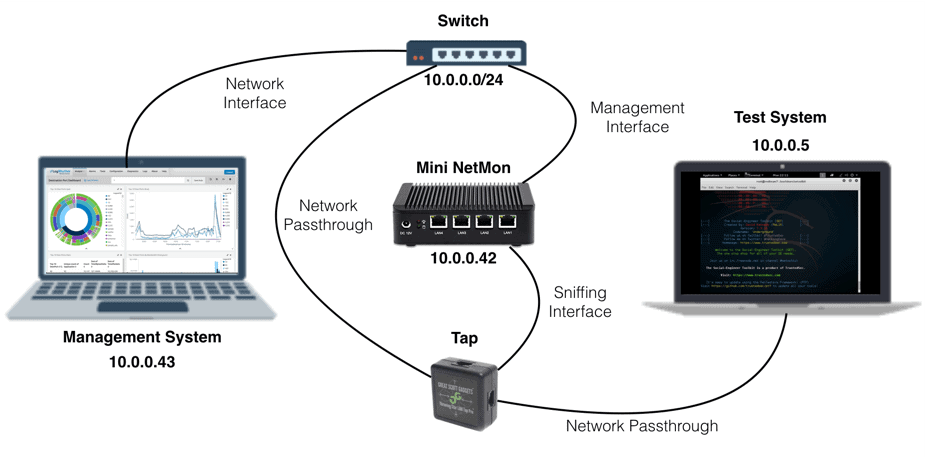
Figure 5: Test network
Once the network interfaces have been configured, power on the NetMon device. Next, browse to the NetMon’s management interface. You will automatically redirect to port 443. From here, follow the on-screen prompts to complete the NetMon configuration.
If all goes well, you will start seeing traffic flow through momentarily.
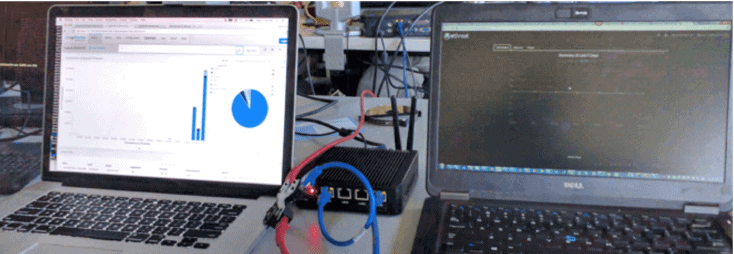
Figure 6: Test – sniffing traffic on a single system
NetMon Deployment
After testing the configuration to ensure that you’re capturing traffic is being captured, let’s translate this to a real-world scenario by configuring the Miniature NetMon on a home network.
In a home network, you’ll need a Tap, Hub, Smart Switch, or a router that supports port mirroring to capture traffic in-transit. There are countless products out there that will support these options; however, the ideal solution is to either use a Switch or configure Port Mirroring from the router directly, as this will have the least degradation on your home network’s connection speed. For optimal performance, we recommend utilizing Cat6 Ethernet cables to optimize the wired connections.
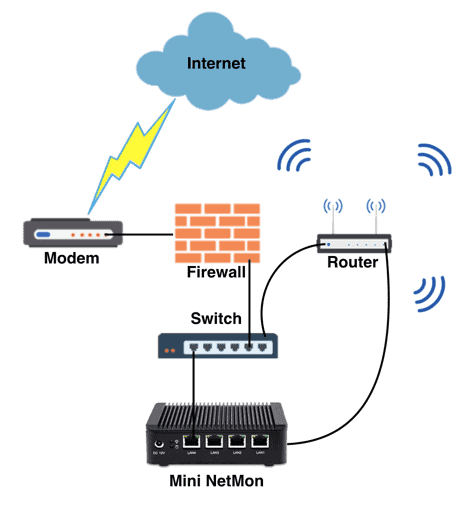
Figure 7: Example network diagram
While a mini NetMon is perfect for the home network, it can be installed just as easily in satellite office locations and small businesses.
Penetration Testing Drop Box
You can also use the Mini NetMon device as a penetration testing dropbox to capture network traffic in your target network.
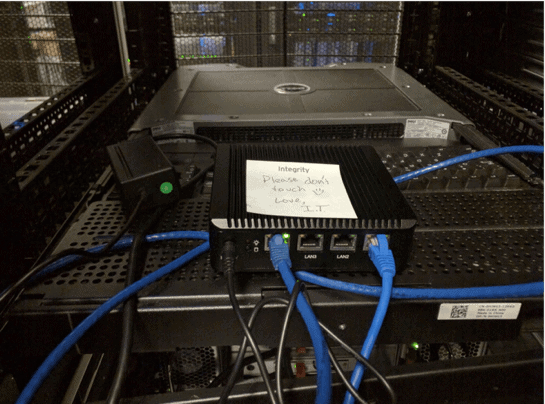
Figure 8: All up in your network, capturing all the packets
In a penetration-testing scenario, you will ideally want to gain access to the NetMon interface remotely. To spawn a reverse-shell that will communicate with a command and control server and allow remote access to the device, all you need to do is configure a cron job using the Python Reverse Shell by Dave Kennedy, or something similar, and configure this to use port forwarding to view the NetMon web interface. From here, you can configure Deep Packet Inspection (DPI) rules to sniff passwords, take full packet captures, pivot to other systems, and much more.
NetMon and the Future
This is just the beginning. There are many more features that we’d like to add to the Mini NetMon — and that’s where we need your help. We’re looking for ideas from the security community around what their needs are, how NetMon can help solve problems they are facing, and general product improvements. Some of the additional items we brainstormed include:
- Reverse Shell for Remote Access
- Passive Wireless Sniffing and Management Interface
- Integrated Software Tap
- Scale Down the Hardware Requirements
If you have any suggestions, post them on the LogRhythm Community.