
Dealing with Syslog devices can be challenging. On the one hand, Syslog devices can send a great deal of logs, and often this is too much for one agent to handle. In addition, it is difficult to configure many different Syslog devices to talk to different agents, which not only takes time, but changing these in the future could become troublesome.
The LogRhythm NextGen SIEM includes over 400 supported Syslog data sources out-of-the-box, which is increasing as more devices are added frequently. A large amount of vendors are using Syslog because it is easy to configure and maintain. It’s also widely accepted as the de-facto standard for logging. To ensure these logs are always available and evenly distributed, a load balancer is a great addition to any architecture.
Let’s explore how a Syslog load balancer can help you prevent downtime and maximize throughput.
Why Use a Syslog Load Balancer?
The main function of the load balancer in a security information and event management (SIEM) environment is to distribute logs across collection agents, avoiding any becoming overloaded and enabling a larger throughput. This also increases redundancy. If any agents go down, the Syslog traffic can be routed to other nodes, therefore, there is no loss in service. In addition, configuration is easy. Only one IP needs to be added to configure the load balancer, and agents only need to be added or removed in one location (on the load balancer).
Traditionally, if you want to load balance Syslog in your environment, you would use an F5 BIG-IP or a Citrix Netscaler. Because NGINX now supports Transmission Control Protocol (TCP) and User Datagram Protocol (UDP) load balancing, an open-source solution can be built to manage this. This is a great solution if you want to implement a highly available system to manage your Syslog.
How to Install NGINX
To install NGINX on Ubuntu from Source, you need to add the stream module. You can refer to the NGINX website for additional help or troubleshooting.
You should note that UDP Syslog will be load balanced per message, and TCP Syslog will be load balanced per connection. Follow the instructions below:
Open a terminal:
$ sudo apt-get update
$ sudo apt-get install gcc (required to compile from source)
$ wget https://nginx.org/download/nginx-1.15.7.tar.gz (check latest version 1 from link above)
$ tar zxf nginx-1.15.7.tar.gz
$ cd nginx-1.15.7
$ sudo ./configure –with-stream –without-http_rewrite_module –without-http_gzip_module
Now NGINX is installed, it can be configured to load balance:
$ cd /etc/nginx (this may be /usr/local/nginx – depending on distro)
In this directory, we have nginx.conf. This is the configuration file that needs editing. You can rename the old file and create a new one.
$ sudo mv nginx.conf nginx.conf.old
$ sudo vi nginx.conf
Here is an example config file we used:
(paste below config changing values for your system)
stream {
upstream syslog_udp {
server 10.100.0.5:514;
server 10.100.0.6:514;
server 10.100.0.158:514;
server 10.100.0.99:514;
}
upstream syslog_tcp {
server 10.100.0.5:514;
server 10.100.0.6:514;
server 10.100.0.158:514;
server 10.100.0.99:514;
}
server {
listen 10.100.0.26:514 udp;
proxy_pass syslog_udp;
proxy_responses 0;
}
server {
listen 10.100.0.26:514;
proxy_pass syslog_tcp;
}
}
worker_rlimit_nofile 1000000;
events {
worker_connections 20000;
}
Explaining Config Values
What do all of the config values mean? Here is a list of definitions:
upstream syslog_udp: List all agent IPs and ports they are listening for Syslog one per line in the above format. This is to receive UDP Syslog.
upstream syslog_tcp: List all agent IPs and ports they are listening on for Syslog one per line in the above format. This is to receive TCP Syslog.
listen 10.100.0.25:514 udp; – This is the IP address and port this box will listen on for UDP Syslog connections. This is where you will configure devices to send UDP Syslog to.
listen 10.100.0.25:514</strong>; – This is the IP address and port this box will listen on for TCP Syslog connections. This is where you will configure devices to send TCP Syslog to.
worker_connections 20000; – This is the maximum number of Syslog connections that are available.
There are more advanced configs you can change, please refer to these here.
Running Syslog Load Balancer (NGINX)
We can now run:
$ sudo service nginx restart
$ ss -anu (check 514 is listening)
Configuring LogRhythm to Talk to the Load Balancer
Here we will configure LogRhythm to talk to the NGINX load balancer. LogRhythm is simple to configure with its built-in advanced settings menu allowing easy configuration of our newly installed load balancer.
For each agent, go to Properties and add the IP address of the newly configured load balancer under the Syslog Relay Hosts. You will also need to check Enable Load Balancing.
Apply and restart agent.
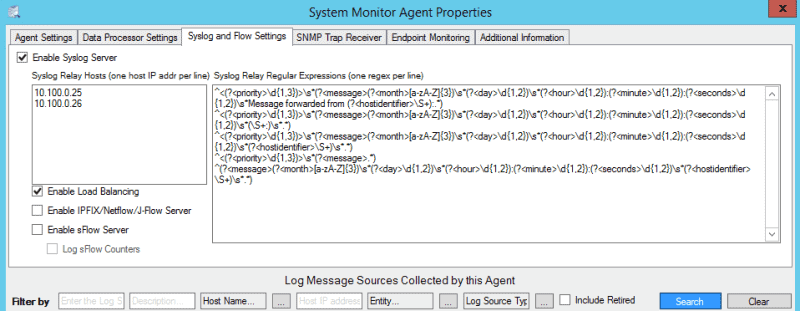
Figure 1: SysMon Agent Advanced Properties
Now you can forward Syslog to the load balancer IP. Log sources will come in as pending and can accept them and they will collect.
Here we have 3 x Syslog Log Gens:
LR-XM = TCP (100 MPS)
DC-1 = TCP (100 MPS)
DP = UDP (1000 MPS)

Figure 2: An example of three Syslog Log Gens
And the TCP load is split between DC1 and DP, because these are the first two in our list using per connection load balancing:
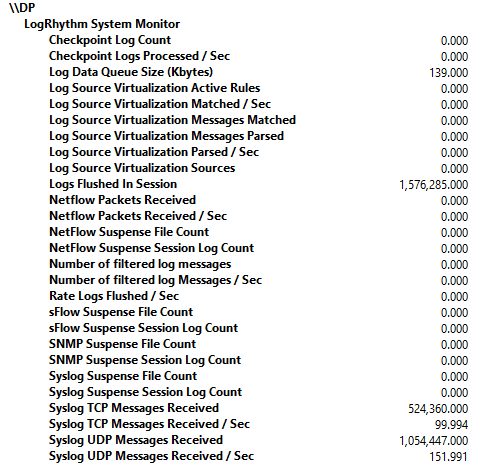
Figure 3: Showing Syslog UDP load balancing and TCP load balancing on DP

Figure 4: Deployment Monitor showing averages of the Syslog being load balanced across agents
Troubleshooting
The error.log (/var/log/nginx/error.log) can be configured to pick up any issues with the service.
The access.log (/var/log/nginx/access.log) can be configured to log all requests from the load balances to agents.
We have Flat File – Nginx Log to parse those.
Further logging information can be found here.
For system health, if no operational monitoring software is available, LogRhythm can put an agent on the load balancer to check for heartbeats.
The Benefits of a Load Balancer
Overall, this solution lets you implement an open-source and highly scalable load balancer without the need to buy an expensive proprietary system. As Syslog sources can send large amounts of data and are being used more and more, using a load balancer can ensure LogRhythm handles this efficiently and data is available at all times.