Hackers are constantly looking for ways to bypass traditional network defenses, and exploiting the Internet Control Message Protocol (ICMP) as a covert channel for a reverse shell is a commonly used method for attack. However, you can use LogRhythm’s NetMon to identify PowerShell tunneling through an ICMP.
From the previous look into the ICMP, you know that, based on RFC 792, a Type 8 ICMP echo request has to send an undefined body of bytes that can be of any content or length. This means that you can send nearly anything in the body of an ICMP, as long as you have a server to generate the right packets and a receiver that can interpret the data.
Because this data region can contain anything, and most network tools ignore ICMPs, nefarious attackers can use it as a channel for tunneling data in and out of your network. There’s a great blog from a few years back explaining the general mechanism.
Tunneling with ICMP
Tunneling with ICMP involves setting up a sender and a receiver that listen for ICMP traffic. The receiver then leverages the data of each packet to send/receive instructions or move information. In this article, I will review the Nishang framework, which is a common set of tools used for generating a PowerShell-based reverse shell over ICMP.
The GitHub page for Nishang houses instructions for setting up the client, server, and the ICMP tunnel. Nishang was originally developed for benign penetration testing and most of the setup instructions focus on that use case. When using NetMon, however, you are probably more interested in the malicious use of the tool!
A Typical ICMP Echo Request
In a typical ICMP Type 8 echo (ping) request, you would expect to see the usual ping request header, followed by a block of data. Because the data isn’t actually consumed by anything, most ping tools use a simple data sequence. Using the network protocol analyzer, Wireshark, you can see this simple data sequence trend by looking at approximately bytes 42 and higher. Note the byte count might be off if the capture has VLAN wrappers.
Click images to expand
Figure 1: ICMP Type 8 Simple Sequence Data Package with Typical Request
In this example, the ping traffic used “abcdefghijklmnopqurstuvwabcdefghi” as the data package. A typical ICMP Type 8 ping reply will contain exactly the same data.
However, if you’ve compromised the listening system, then you can use the data package to send instructions or commands. In the case of the ICMP reverse shell, you see that the request and reply bodies no longer have matching data! In fact, most of the time there isn’t even a reply message at all.
Compromising the ICMP
If you capture the ICMP traffic associated with Nishang, you may see a sequence of ordinary ping request and replies. This is usually reconnaissance to make sure the target is there and alive. The ICMP traffic starts to look strange with an abnormally large request that has an interesting body:
Figure 2: ICMP Type 8 Data Package with Unusually Long Request
It seems a bit suspicious that the ping request has gone from “abcdefgh…” to “Windows PowerShell running as user Foss…”. Seeing that kind of message in an ICMP packet should make you suspicious. You might have to rule out your local penetration tester, like our Greg Foss, who could be playing a prank on you.
Penetration testers can use hacker tools such as NPING, HPING2, Nemesis, SING, or even regular Linux utilities to craft custom ping traffic such as iputils. In fact, Mr. Foss and I recently presented on Security Weekly, where we discussed defending against penetration testers.
While this anomaly could be a result of your local penetration tester, you may also be seeing the start of a PowerShell-based reverse shell session!
From looking at the traffic generated specifically by Nishang, you can see that there is a reproducible and highly diagnostic signature in the first echo packet. The first abnormal packet always meets the following criteria:
- It is an Echo (Ping) request. The ICMP packet is Type 8.
- The first portion of It contains a “Windows PowerShell” data package.
- It contains the name of the user tied to the PowerShell.
For the purpose of this blog, I’m going to focus on just these three points. There are definitely other warning signs of a reverse shell that you can pull from future packets. For example, you can look for abnormal patterns in PowerShell command executions. However, in order to effectively reduce mean time to detect and respond to a threat, you want to receive an alert at the start of the reverse shell session rather than wait for more actions to occur. You can always pull additional patterns and reverse shell warning signs from the packet captures (PCAPs) later, during the investigation phase.
Making a DPA Rule to Recognize the Shell
As referenced in the recent blog Using Deep Packet Analytics to Extract Specific Bytes, you can use DPA packet rules to extract specific bytes out of each packet. For this DPA rule, you want to:
- Only process ICMP Type 8 packets (otherwise known as Echo requests).
- Extract the first few payload bytes to see if it matches “Windows.”
- If you get a match, extract the probable user name.
- Add a metadata field indicating the session start and the user name.
Because this has to be a packet rule, you can’t raise an alarm at this time. You will need a second rule (found below) to raise the alarm if you see your custom metadata fields.
The complete source code for the rules described in this article is available in the LogRhythm Community under the NetMon DPA Rules section.
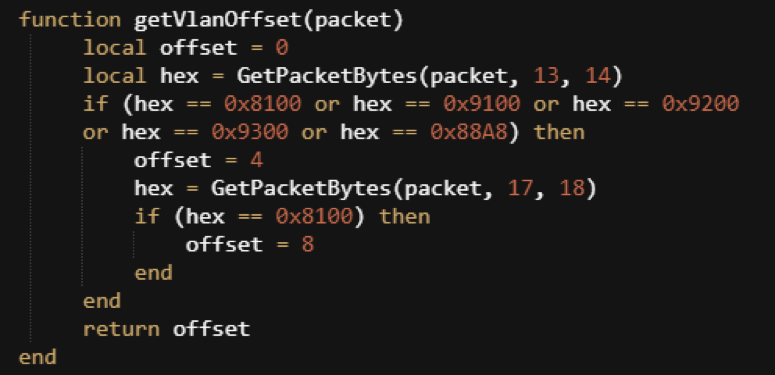
Helper Function 1: Get VlanOffset
First, you will need to pull the function, provided by the ICMP NetMon blog,, to grab the VLanOffset value:
Figure 3: VLanOffset Helper Function
This function will help you unwrap packets that have a VLAN or double-VLAN header.
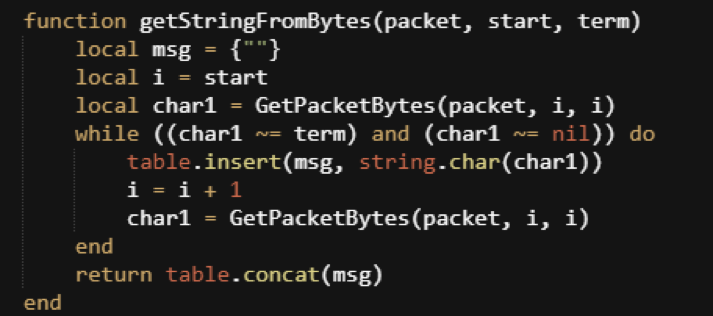
Helper Function 2: Reading a Stream of Bytes
The next helper function you need will extract a sequence of bytes and return a string. You will want to use a table to store the bytes in order to avoid Lua string concatenation functions. In the programming language Lua, merging strings is a relatively expensive operation in terms of CPU cycles and memory consumption.
Figure 4: Helper Function That Will Extract a Sequence of Bytes and Return a String
This function begins reading the packet from the “start” byte and continues until either the end of the packet or until it reaches a specified termination character.
The Main Function
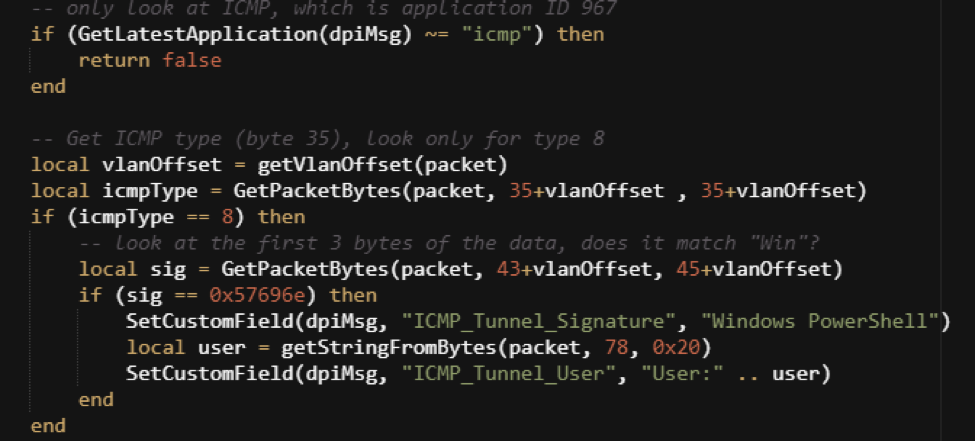
The main function is essentially a wrapper of “criteria” around the creation of two metadata statements. The criteria are as follows:
- Make sure the packet is ICMP.
- Get the ICMP Type value, and make sure it is Type 8 (Echo Request).
- Get the first few bytes of the data package and check for “Win.”
If you have an ICMP Type 8 packet, where the data starts with “Win,” then you’ll want to grab the user value and create custom metadata fields. These fields indicate that the packet is likely the start of a Nishang PowerShell over ICMP.
Figure 5: The Main Function
It is important to note that the signature you are using here is the hex value of the first three expected bytes. The “Win” string is actually represented as the hex sequence 57 69 6E. Fortunately, you only have to worry about basic ASCII and not a double-byte Unicode string structure.
In this example, you have a potential false-positive condition. Any ping that uses “Win” to start the data packet would trigger the rule. You could make a more robust signature detection by using the function “getStringFromBytes” and then looking for the “Windows PowerShell” signature. This more robust detection might have a larger impact on processing performance, but it would be an easy adjustment if you happen to
have normal ping traffic that has a data component starting with “Win.”
Creating the Alarm Rule
The Packet Rule (shown in Figure 5) will create custom metadata fields indicating that the Windows PowerShell tunneling signature was detected and also which user is associated with that particular shell. However, this only gives you the metadata; it does not trigger an alarm.
To create the alarm rule, you need to make a separate flow rule that looks for ICMP traffic where the custom metadata exists. This rule will raise an alarm on any flow where the metadata exists.
Figure 6: Creating an Alarm Rule
Running the Rules
Assuming you have successfully created both rules without syntax errors, you can begin testing your rules. To test your rules, you need to start an ICMP session with tunneling. If you have the time and environment to set up a Nishang sample, you can generate your own traffic. You might also want to enlist the services of your favorite penetration tester!
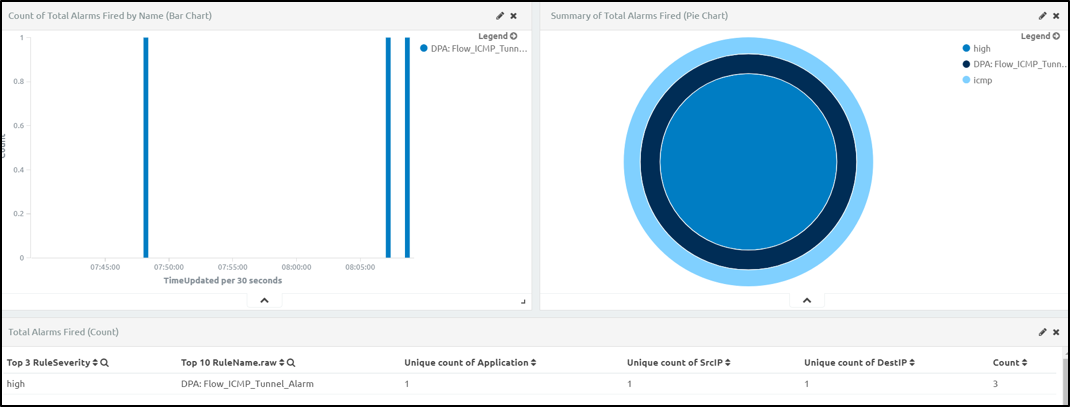
When LogRhythm’s Greg Foss decided to practice his penetration testing skills, we decided to grab some resulting sample traffic. Unfortunately, we can’t share the PCAP, and have to blur out a few details to keep Greg’s victims safe.
Figure 7: Penetration Testing Sample Traffic
I’ve run the PCAP a few times, but we can clearly see the alarm is firing with a high severity. Drilling into the details, we see that the session actually contains three separate PowerShell start commands.
Time
Julth 6th 2017, 08:07:24.000

Application
icmp

Duration
0:01:00

FlowCompleted
true

Session
279e24b2-d6af-453c-b534-209fbe911884

ICMP_Tunnel_Signature_NM
Windows  PowerShell, Windows PowerShell, Windows PowerShell

ICMP_Tunnel_User_NM
User:Foss_, User:Foss_, User:Foss_
Figure 8: Three Separate PowerShell Start Commands
This makes sense if we remember that we some inconsistencies when dealing with ICMPs. ICMP is a connectionless protocol—each packet is a session by itself.
When using NetMon, ICMP traffic sequences between two end points (the same source IP and destination IP), and they are grouped into a single ICMP session. The session only ends when there is a sufficient time gap between traffic to close the session. Because of this, the alarm may only fire when the session ends, or when it reaches the “intermediate flow” time limit which is typically about five minutes.
What’s Next?
Using the techniques presented here, you could create custom rules for nearly any signature you can detect in the bytes of a single packet. This includes potentially building rules for protocols like BBSRat, Gh0st, and many others.
You could also use what you’ve learned here to find new ways to use NetMon and win up to $18,000 by entering our Rule Your Network Challenge! We’re looking for entries in three categories: novel threat detection, hunting dashboards, and IT operations use cases.
Digging into ICMP, or another foundational protocol such as SMB, DNS, or LLMR, could be your ticket to win! Be sure to enter the contest before the August 31st deadline, and start analyzing your ICMP traffic to help keep your network safe from attack.


