New to LogRhythm 7.4: Playbooks Feature Set
Standard procedures have been a cornerstone of security best practice since their invention. You may call them runbooks, standing procedures, checklists, or playbooks. Either way, you likely have one or more collections of “when X happens, do steps X1, X2, X3.” With the launch of LogRhythm 7.4, we took this standard best practice and fully incorporated it with case management in our web console. Our new playbooks feature set lets you:- Create playbooks
- Attach playbooks to cases
- Use playbook metrics to optimize your SOC operations
- Support your security best practices
- “Using Incident Response Playbooks, Metrics, and Automation in 7.4” webinar
- Sample playbooks in Community’s “Shareables” section
- “Developing and Managing Incident Response Playbooks” presentation from RhythmWorld 2018
- Full API documentation in your LogRhythm deployment at


The Mission: Editable Playbooks
The LogRhythm Labs team developed a set of prebuilt playbooks. However, the playbooks are designed to be simple text files that you can edit and manage. That means you need a mechanism to:- Read the plain text files
- Connect to a security information & event management (SIEM) solution to inject the content as playbooks
- Use the API to export the finished playbooks in the export format
- Use the API to import the playbooks back into the SIEM and verify that everything worked
Overview: The 7-Step Process
To create, upload, and export a playbook:- Confirm the execution system has the right certificates.
- Create an API token using the Client Console.
- Read the input file.
- Create the playbook and get an ID.
- Inject each procedure into the playbook.
- Export the completed playbook in the .pbe format.
- Import the playbook into a different SIEM instance to verify that the procedure worked.
- /lr-case-api/playbooks: This endpoint will let you create the playbook and get a unique ID value for each playbook you create. This is the “container” for your procedures.
- /lr-case-api/playbooks/[playbookid]/procedures: This endpoint will let you add procedures to the playbook you create in the first call, described later in step 4.
- Think of the URL as a pointer to the resource with which you’re working.
- The HTTP verb indicates the action (e.g., POST, PUT, GET, etc.).
Step 1: Confirm the Certificates
All the LogRhythm REST APIs leverage HTTPS/TLS 1.2 with trusted certificates. Although this is a security best practice, it is also a bit of a barrier to jumping into using the APIs. Therefore, you must first install the correct certificate on the client machine that will run the APIs. By default, the Case API uses the self-signed certificate located in C:\Program Files\LogRhythm\LogRhythm Common\LogRhythm API Gateway\tls\server.crt on the LogRhythm Web Console server. You should install this certificate into the Trusted Root Certificate Authority Store on the machine from which you will run your case API scripts. Here are the steps to install the certificate:- From the machine running the case API (typically, the XM or Platform Manager), copy C:\Program Files\LogRhythm\LogRhythm Common\LogRhythm API Gateway\tls\server.crt.
- Paste it to the machine on which Case API scripts will run.
- Double-click server.crt on the machine which Case API scripts will run. Windows should associate this file type with the certificate manager application.
- Click Install Certificate.
- Click Local Machine (note that it isn’t the default).
- Click Next.
- Click Place All Certificates in the Following Store.
- Select Trust Root Certification Authorities.
- Click OK.
- Click Finish.
Step 2: Get an API Token
Along with the HTTPS certificate, you also need an API token. This serves the following purposes:- The token provides a security barrier to calling the service. This helps us prevent unauthorized access to the system.
- The token identifies “who” is calling the API. This allows the SIEM to determine appropriate access levels and permissions.
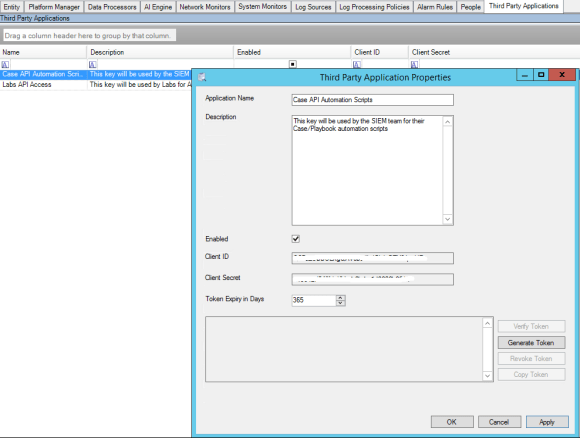 Figure 1: The Third-Party Application Properties tab in the LogRhythm client console
- Open the LogRhythm client console.
- Select the Deployment Manager.
- Select the Third Party Applications tab, the last tab in the row.
- Note: This is a new tab in 7.4!
- Create a new third-party application. To do this:
- Click the green plus sign in the client console toolbar. This will bring up the Third Party Application Properties box.
- In this box, type in the name and description for your application.
- Click Apply to generate the token. This will force a quick restart of the authentication server to set up and validate the token.
- After a few moments, the client ID and client secret will appear.
- Adjust the expiry date as desired to make the token last longer or expire faster. By default, the token expires after 365 days (one year).
- Click Generate Token to create an API token.
- Enter the user name and password of the LogRhythm account that the token should connect with.
- Copy and paste the token into a text file that can be referenced from the PowerShell script.
Step 3: Read the Input File
The PowerShell scripts expect certain input variables. For simplicity, they are set up as hard-coded variables in the script. You can extend the script to read these from a property file. For our production code, we wrote .json input files that stored the key values. The following variables need to have values assigned for the scripts to work:- $Server: This is the hostname of the server running Case API. This name must match the subject name in the server’s certificate. If not, it won’t pass certificate validation. Example: server.domain.local
- $ APIKeyPath: This is the path and filename to the text file containing the API key pasted from step 2. Example: C:\RestAPI\APIKey.txt
- $PlaybookJSON: This is the path and filename to the .json file for creating the playbook. We’ll explain this more below. Example: C:\PlaybookCreate\CreatePlaybookRequest.json
- $ ProcedureJSON: This is the path and filename to the .json file for playbook procedures (explained below). Example: C:\PlaybookCreate\UpdatePlaybookProcedure.json
Step 4: Create the Playbook and get an ID
The first call you need is a POST (i.e., create a new resource) to the playbook’s endpoint because you are creating a playbook. The POST method accepts a JSON body that contains the details of the playbook. The call is: The call features a JSON body of:
{
  name: Playbook Name,
  description: Playbook Description,
  permissions: {
    read: privateOwnerOnly,
    write: privateOwnerOnly
  },
  entities: [
    1
  ]
}
- Name: The name of the playbook.
- Description: A short description of the playbook, including its purpose and when to use it.
- Permissions: Our Online Help explains the permissions. They define who can use or modify the playbook.
- Entities: By default, you want this playbook to apply to the Primary Entity ID (1). But if you were segregating playbooks by entity, you could restrict it to other entities.
#Define connection parameters to API
$APIConnection = $Server + ':8501'
$APIKey = Get-Content $APIKeyPath
$token = Bearer $APIKey
$header = @{Authorization=$token}
#Force PowerShell to use TLS 1.2
[System.Net.ServicePointManager]::SecurityProtocol = [Net.SecurityProtocolType]::Tls12
# Create playbook
$url = https://$APIConnection/lr-case-api/playbooks/
$method = 'POST'
$body = get-content $PlaybookJSON
$playbook = Invoke-WebRequest -Uri $url -headers $header -Method $method -body $body
# Capture GUID from creation response for updating procedures$playbooksTable = $playbook.content|ConvertFrom-Json
$playbookID = $playbooksTable.id
Step 5: Inject Procedures
Creating a procedure for the playbook requires the following (and slightly more complicated) URL path: When you create procedures, you want to “create or replace”; therefore, PUT is a more appropriate HTTP verb. The JSON body looks like this:
[
  {
    name: new procedure name,
    description: Send email to [email protected],
    dueWithinSeconds: 0
  }
]
#Populate Playbook with procedures
$url = https://$APIConnection/lr-case-api/playbooks/$playbookID/procedures/
$method = 'PUT'
$body = get-content $ProcedureJSON
$playbook = Invoke-WebRequest -Uri $url -headers $header -Method $method -body $body
Step 6: Export the Playbook
Exporting the playbook is as simple as a single call to the “export” method on the playbook resource. You will need the playbook ID from step 4! The full call is: Because this is a GET method, you don’t need to pass in any JSON body. You only have to capture and save the file returned by the call. Using the following PowerShell call, this is simple:
$method = 'GET'
$url = https://$APIConnection/lr-case-api/playbooks/$id/export/
Invoke-WebRequest -Uri $url -headers $header -Method $method -outfile $ExportPath -passthru
Step 7: Import the Playbook for Verification
Now, you may want to verify the export and automate loading the playbook (.pbe) file back into the SIEM. For this, there is an easy-to-use import endpoint: Because you’re uploading a file, there’s a little more work to set the encoding and HTTP mime type. You also typically want to put some timeouts around this command in case of slow network activity. In PowerShell, the command looks like this:
#Get the file path as a string
    $InFilePath = Convert-Path($Infile.PSPath)
    write-host Importing $InfilePath
    #Encode the file contents for the web request
    $fileContents = [IO.File]::ReadAllBytes($InFilePath)
    $enc = [System.Text.Encoding]::GetEncoding(iso-8859-1)
    $fileEnc = $enc.GetString($fileContents)
    # Create the request body.
    $bodyLines = (
        --$boundary,
        Content-Disposition: form-data; name=`file`; filename=`$InFile`,
        Content-Type: application/octet-stream$LF,
        $fileEnc,
        --$boundary--$LF
        ) -join $LF
    try {
        # Returns the response received from the server (we pass it on).
        #
        Invoke-WebRequest -Uri $URL -Headers $header -Method $method -ContentType multipart/form-data; boundary=$boundary -TimeoutSec 20 -Body $bodylines
        }
    catch [System.Net.WebException] {
        Write-Error( FAILED to reach '$URL': $_ )
        throw $_
        }
    }